Introduction
This tutorial describes how to create a journal entry in Smartwerks. Entries to the General Ledger, including reverse entries, are made through the Journal Entry screen. Journal entries can be made for the current period or for prior G/L periods. However, you cannot post further back than the date you chose in System Files > System Settings > G/L and that date must be on or after the first day of the prior fiscal year.
Step-by-Step
- Select G/L > Journal Entry from the top menu.

Click image to enlarge.
2.
From the Posting Date drop-down list, choose the date you want this entry to post to.
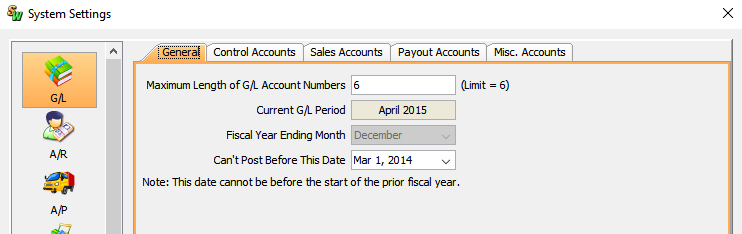
NOTE: You cannot post farther back than the Current G/L Period date specified in System Files > System Settings > G/L.
Click image to enlarge.
In this example, you cannot post any farther back than March 1, 2014. If we wanted to, we could have set the Can’t Post Before This Date field as far back as January 1, 2014.
NOTE: If you are posting to a prior period, you will receive the message, ‘WARNING: Posting Date is set for previous G/L Period’. Click the OK button to proceed.
- Select a Journal Source Code. You can create new source codes on the G/L > Journal Source Code screen.
- Enter any Comments for this transaction.

Click image to enlarge.
- Click the New button in the toolbar. A line opens in the table.
- Choose the first Account that is being posted to.
- In the Reference Number field, enter a number that can be used to search for this transaction. Choose something that will help you to identify this transaction, like today’s date.
- Enter a Description of the changes being made to the account by this journal entry.
- Enter the Debit or Credit amount that is being posted to this account.
- Click the New button in the toolbar. A second line opens in the table.
- Choose the second Account that is being posted to. The reference number and description from the first account appear on this line.
- Enter either the Debit or Credit amount that is being posted to this account.
- Add as many accounts as you need to make your postings correct. To add an additional line, click the New button. To delete an entry, select the line and click the Delete button.IMPORTANT: The net balance of the entries made must be zero. This maintains the integrity of the General Ledger. If you use multiple lines, the total debits need to equal the total credits.
- If you want to print the entries, click the Print button.
- Click the Save without Posting button and the entries are saved without being posted to the General Ledger. You can return later and either post or edit the entries you made. To do this, enter the same posting date and journal source code, and the entries will appear on the screen.
- When all the entries are complete and the Net Balance is $0.00, click the Post to G/L button and these entries will be posted to the General Ledger.